Drawing a waterfall may sound intimating, but as we will see below, it is quite easy to do with few simple strokes that any beginner can do. So, grab a pen and follow along. Such fun drawings gives us a creative break in our lives and are always enjoyable. Try one now.
Step 1: Draw Top of Waterfall
Start with a slight wavy line like below, indicating the top of waterfall, may be a river or a stream.
![]()
Step 2: Draw Falling Water:
Use slightly curved lines like shown below to indicate falling water. Turn the paper if need be to draw it. Don’t make the lines flat. Give them a slight curve or bulge as shown below.

Step 3: Add Volume to Water
Use tapered dark like shown below to indicate volume in falling water.

Step 4: Indicate Water Flowing Out
After the fall, water continues its journey towards the viewer. Use lines like below to draw ripples that indicate that. Notice how they open up and grow bigger as they go out.

Add such ripples to the waterfall.

Step 5: Indicate Rocks and Mist
Add some darks at the bottom of fall to indicate some stones/rocks and dots going up to indicate mist. Keep it irregular. The notion of suggestion is very important in pen and ink. With just some dark irregular shape, a feel of ‘something there’ can be conveyed.

Step 6: Indicating Foliage on the Side
To give a finished feel, something on the sides of the fall should be indicated. Wooded area works very well and is very easy to do as shown below.
Use open loops to indicate foliage. make the base darker and add tapered darks to indicate trunks etc.

Use the above technique to indicate wooded area as banks of waterfall.
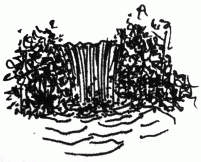
Step 7: Adding Reflection in Water
Use more of water stroke to darken it to indicate reflection as shown below.
![]()
Use the above technique to indicate reflection of wooded areas.

Step 8: Add Sky
Add Sky using horizontal parallel lines to finish this quick drawing.

This finishes this tutorial of drawing a waterfall. Hopefully it motivated you to pick up a pen and try drawing it and see how easy and enjoyable it is to do such drawings with pen and ink.
My completely FREE Tutorials provide further instructions in drawing other elements of nature. My pen and ink workbooks are ideal for anybody interested in learning to draw pen and ink landscapes.
Drawing is always more fun in company and so pl. do share this in your social media or forward it to others who you feel might enjoy it.
Happy Drawing,
Rahul
Step by Step Pen and Ink Drawings