Here I discuss pen strokes that are used when drawing landscapes with pen. Though a line is often associated with drawing with pen, this is usually not the case when drawing landscapes. With landscapes, often different strokes as discussed below are used that provide opn organic feel needed in landscapes. Use of these strokes in context o drawing different elements of nature is discussed in detail in pen drawing tutorials:
Pen Stroke: Small Wandering Line
This stroke is as follows. It is obtained by holding the pen lightly and giving it small gentle movement so that the resulting line has a gently ‘wandering’ quality.

This stroke though it looks simple can be used to provide many different textures and in drawing of different elements of nature as shown below.

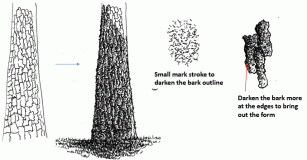
This stroke is referred to as ‘bark’ stroke when drawing tree trunks and weathered wooden posts. It can also be used to draw water and Sky. By using different length, overlap and density, it can be used to draw many different elements. Following night sky is draw using this stroke.

Longer flowing lines in this manner can be used to indicate water flow in a river as shown below.

Please refer to tutorials for detailed technique on usage of this stroke when drawing different elements.
Pen Stroke: Scribble
Scribbling is something we are all familiar with. In drawing landscapes, it can be used in many different ways. By using more or less stroke, different tones can be easily achieved.

Pine trees are ideally suited for drawing with scribble stroke as sharp edges of scribble conveys feel of needle foliage.

Pen Stroke: Open Loops
Open loops and other similar marks as shown below are ideal for drawing tree foliage.

When used in different shapes, sizes and orientation, they convey feel of foliage as shown below. Different volume of stroke can be used to bring out volume.

Trees can be easily drawn using this stroke as some examples below show. Pl. consult tree drawing tutorial for in depth discussion.

Scribble vs Loop Stroke:
Both scribble and loop stroke can be used to create tree foliage, bush, background foliage etc. In a scribble stroke, there is often coarseness due to sharp angles of scribble lines that are perfect for pine trees as we saw above. In a loop stroke, each ‘loop’ is created separately by lifting the pen between strokes and because of this scribble is much faster than doing loop stroke but loop stroke gives a more open airy feel. For close up foliage, loop stroke is better and for bit distant foliage, scribble stroke can be used effectively. Make sure the orientation of the scribble and loop is random and in different sizes to give it a feel of foliage.
Pen Stroke: Dots and Ticks
Dots and ticks can be used alone or in combination with loops to create foliage, draw bark texture and even clouds. Some example of their usage is shown below. You will find right technique for their usage in the context of drawing different elements in pen drawing tutorials.


Pen Stroke: Slightly Curved Lines
Slightly curved lines can be used to draw grass and ground cover.

Longer such lines can be used to draw wild flowers as shown below.

Pen Stroke: Tapered Tick Mark
This stroke is used to add a feeling of roughness to stones, barks etc. Practice drawing them in different orientation and sizes. It is also important that they have a tapered feel as this is how crevices look in perspective. Avoid drawing flat rectangular and circular shapes.

This is the most important and basic technique to create a tone when drawing with pen and ink. Practice drawing lines equal distance from each other.

It is important to make sure that your hands are not hesitant when drawing a line. In other words, DO NOT draw a line very slowly and deliberately. This will cause the line to have edges and bad impression. Instead, slowly bring your pen down to the paper and create a confident FLOWING line with a swift stroke. Don’t hurry it either. Key is to find the balance between slow deliberation and fast impatience to create a line that is confident and inviting. This will come with practice as every person has their own rhythm. Practice often and find your own rhythm. You will know when you get it.
The lines also don’t have to be exactly parallel and equidistant. The key is to create an impression of ‘uniform’ tone with a set of lines. In other words, the deviations in the distance between the lines should be small enough so that our mind and eye don’t notice them. Instead our mind should instead see and focus on the lines as a whole to see a uniform tone.

Initially, don’t attempt to draw longer parallel lines as this requires movement and control from the shoulder that takes more time to attain. Lines an inch or so long can be drawn using the movement of wrist and should be attempted initially.

After you can draw one set of parallel line convincingly, next step is to add multiple layers to create tonal difference. As you add more layers, you create more density of lines and this creates darker tone. Creating such tonal difference is the basis for creating form or volume for elements like tree foliage, stones, mountains etc and is very important to practice and get good at doing it.

Parallel lines at an angle of 45 degrees should be attempted first as this is the natural position of a wrist. But parallel lines at other angles, especially vertical and horizontal parallel lines are also extensively used in P&I drawing. If you are adept at drawing parallel lines at 45 degrees, then these lines at other angles can essentially be drawn by rotating the paper appropriately.
This stroke is one of the most basic stroke and should be practised extensively till you are comfortable with it.
Rounded Parallel Lines:
This technique is used to give exposed form to ground, stones, mountains, trees etc. Here curved lines are drawn in parallel. The shape of curvature of the lines with determine the shape of overall form. Practice drawing these in different sizes and curvature.

This should get you started. Practice above pen strokes whenever you can. Use of these strokes in the context of drawing an element is discussed in detail in the tutorial for that element. There are other strokes that are used in pen and ink drawing and indeed you will develop your own repertoire of strokes and their usage as you progress on this journey. Always experiment with different strokes and feel free to reach out to me with any questions and clarification.
Have Fun,
Rahul
I will be regularly adding new templates and tutorials. If you would like to be notified of any new addition, pl. send me your email address in the form below.