Last week we looked at how to draw a simple winter scene using bare trees. This week we will take a look at how to draw pine trees. These trees also symbolise winter and can be used to draw very pleasing winter landscapes.
Step 1: Draw Tree Outline
Pine trees come in limitless variety of shapes and sizes but one shape that symbolise its association with winter is that of a feel of a ‘Christmas Tree’ with a conical outline. Start with such an outline. Don’t draw a hard outline but instead use dots or small swirls that will blend in with the needle foliage stroke in next step.

Step 2: Add Needle Foliage
There are many ways of drawing needle foliage and one of the simplest but very effective way is to use sharp scribble stroke as shown below. Sharp edges of such stroke give a feel of needle when used in high density.

Sharp edge scribble like shown above can be used to render feel of Needle foliage. Other techniques for drawing needle foliage are covered in vol 3 of my pen and ink drawing workbooks and also in the FREE tutorial. Texture inside the outline with this stroke.

Step 3: Add Tonal Variation in the Foliage
To bring out the feel of depth in a foliage, it is very important to have tonal variation, or different levels of light and dark tones in it. Darker tones are perceived to be in the back where as lighter tones are perceived to be more Sun lit and hence in the foreground. Add such tonal variations to the centre area of the tree.

Add more scribble in irregular manner to make some areas darker as shown above.

Notice how addition of irregular dark’s in the centre area of tree gives it a feel of depth. Drawing Foliage is further discussed in vol 1-2 and vol 5 of my pen and ink workbooks.
Step 4: Texture the Edges
At the edges, indicate feel of needles in layers as shown below.

Notice how addition of just some indication of needles makes our brain interpret it as a pine tree. Such small ‘suggestions’ are vital part of pen and ink drawing.
Step 5: Texture Trunk and Ground Cover
Finish by texturing trunks using 2 tone technique and indicating a ground cover.

This is how a simple coniferous tree can be easily drawn. By changing shape and size, many variations on this can be done.
Step 6: Add Other Trees in the Foreground
Using the above steps, other foreground trees can be added.

Step 7: Add Trees Behind
To get perception of depth, other trees behind foreground trees should be added. Start by drawing the outline of behind tree that is set back and partially hidden by foreground tree as shown below.

Next texture it using the same steps above but keep the area around overlapping edge lighter. This helps to distinguish between the two trees.

Finish the behind tree as before.

Step 8: Add Other Trees
Other behind and foreground trees can be added in a similar manner to create a nice feel for the drawing. Always draw the trees in front first followed by trees behind.
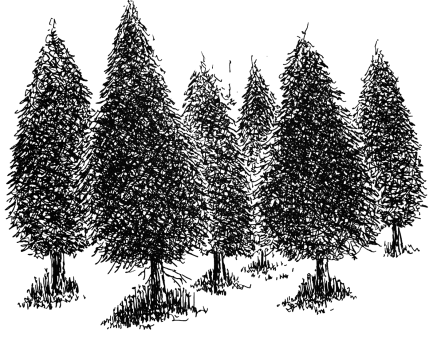
Step 9: Finish with Ground Cover and Sky
Finally add grass as ground cover and sky along with a distant tree line to give it a finished feel. The original drawing is around 5 by 6 inches.

By using different combination of such trees, along with use of other foreground elements like wooden posts, stones, a river etc., pleasing winter drawings on this theme can be easily drawn. My Pen and ink drawing workbooks covers drawing these other elements of nature in detail.
By combining such coniferous trees with bare trees as discussed last week, further feel of winter can be added. Following is such a drawing at 6 by 8 inches.

This completes this tutorial on drawing pine trees. Hopefully it inspired you to pick up a pen and do some drawing. Starting is always the hardest, but once you get in the rhythm of drawing, you will progress fast and see how wonderful it is to do such simple landscapes and have a break of creative time. You can also consult my completely FREE Tutorials and pen and ink drawing workbooks for further instructions on pen and ink drawing.
Do let me know if you like these posts. Any thoughts on their improvement and suggestion for content is most welcome. Feel free to share these with others and also to promote them in your social media.
Happy Drawing,
Rahul